HowToStartWithUtgard
- Jürgen Rose
- Jens Reimann
Getting Started with Utgard - a tutorial
What is Utgard?
If you found out about Utgard, then you probably know what it is for. But for the uninitiated here a short introduction:
OPC (http://en.wikipedia.org/wiki/OLE_for_process_control) is an industry standard to allow a unified access to a varied number of devices, be it controller of any kind, sensors, whatever. Many specialized hardware components have their own OPC Server (e.g. WinCC, ABB, ...), but there are quite a few implementors which provide generic "OPC servers" which provide access to devices via a wealth of protocols. Prominent examples are Matrikon (http://www.matrikonopc.de/opc-server/) or Software Toolbox's TOP Server (http://www.toolboxopc.com/index.html).
Utgard only supports the client part of the OPC DA 2.0 interface, so any OPC UA setup (which is increasingly popular) will not work!
For the purpose of this tutorial, we will demonstrate the usage with TOP Server, but any other OPC server should work.
Prerequisites
- Windows computer to install the OPC Server (note that Home Editions of Windows might not work due to restrictions on the Windows operating system)
- on the development computer a functional JDK (6 or 7)
- on the development computer a running Eclipse 3.5+ or 4.x
Setting up TOP Server
The installation of TOP Server is pretty straight forward, no surprises there. The tricky part is actually the DCOM configuration. Helpfully on the TOP Server website is a comprehensive guide (http://www.opcactivex.com/Support/Tutorials/DCOM_Tutorial_-_Configuring_th/dcom_tutorial_-_configuring_th.html), which explains how to configure it. If you do all the steps, the DCOM configuration should work. At least it did in our test setups. If it doesn't contact your local system administrator or OPC Guru to help you out. Problems may arise from a large number of causes (firewalls, routers, permissions, ...).
The important bit is, please try to access the server from a different computer to ensure the communication really is via DCOM and not through a local COM call. For this you can use a OPC Client, here we used the Matrikon OPC Explorer.
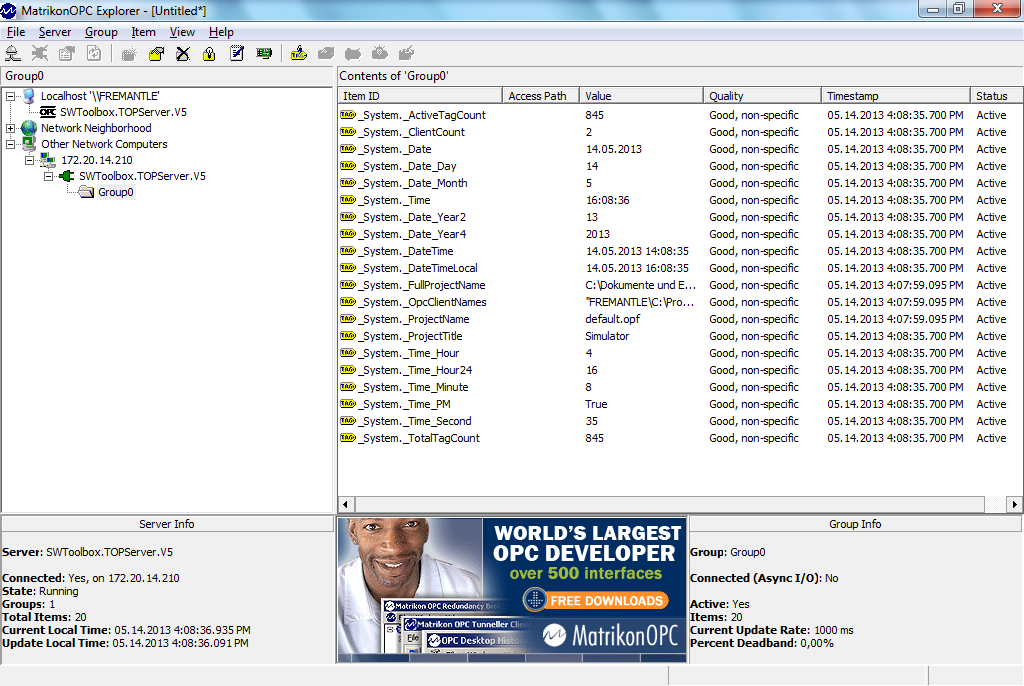
Even though no additional items are configured, you should be able to access the TOP Server internal items, like shown in the screenshot. It can be tricky to setup the security, for this example I had to create the identical user on the client machine and then to start the OPC Explorer with this user, to access the server at all.
This is already enough to get started with the first step, getting updates from one of the existing items.
Retrieving values
As we could see in the section above, there are already some items available, we want to use one, that is permanently updated, so in our example we will use the tag "_System._Time_Second"
The first step, is to get the needed libraries for Utgard, on the download page of the openSCADA website, just download following files: Utgard binaries (plain zip), jinterop binaries (plain zip) and External binaries (plain zip).
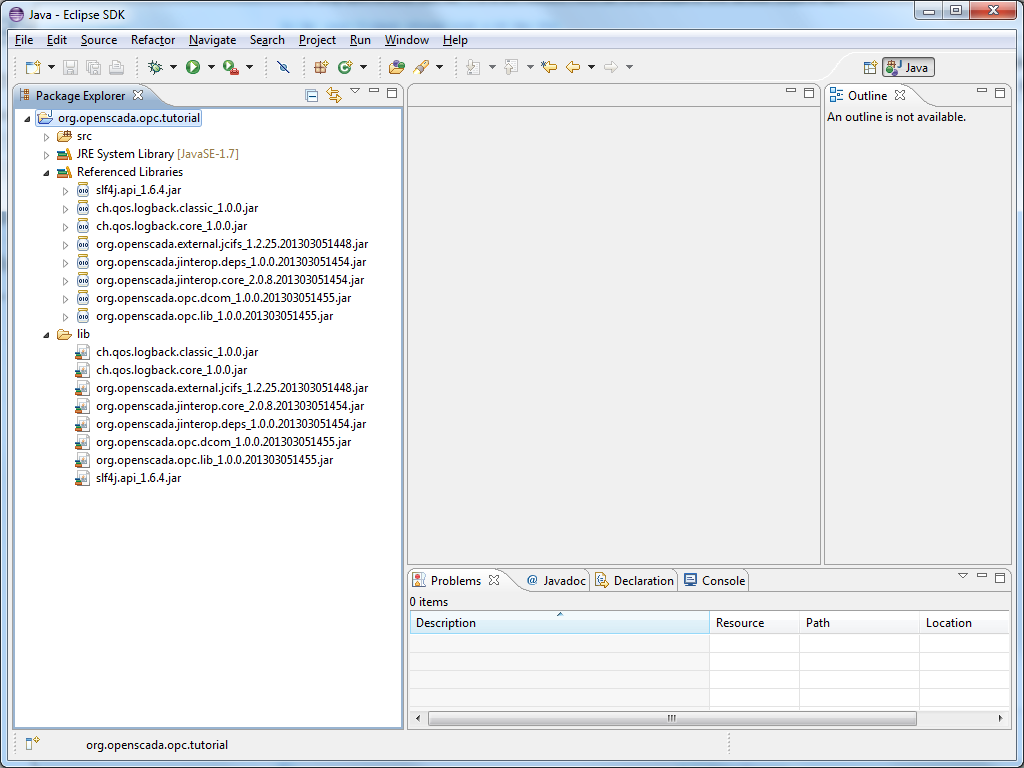
Start Eclipse, create a new project, put following libs into a lib folder and add those to the build path:
- slf4j.api_1.6.4.jar (from externals; openscada uses slf4j througout the project, thats also one of the reasons for the jinterop fork)
- ch.qos.logback.classic_1.0.0.jar (from externals; slf4j needs an implementation, you may use a different one, like log4j; openscada uses logback, so we use it for the purposes of this tutorial as well)
- ch.qos.logback.core_1.0.0.jar (from externals; slf4j needs an implementation, you may use a different one, like log4j; openscada uses logback, so we use it for the purposes of this tutorial as well)
- org.openscada.external.jcifs_1.2.25.201303051448.jar (from externals; a dependency for jinterop)
- org.openscada.jinterop.core_2.0.8.201303051454.jar (from jinterop; the library to provide dcom access for java)
- org.openscada.jinterop.deps_1.0.0.201303051454.jar (from jinterop; some dependencies for jinterop)
- org.openscada.opc.dcom_1.0.0.201303051455.jar (from utgard; OPC specific DCOM stuff)
- org.openscada.opc.lib_1.0.0.201303051455.jar (from utgard; the actual Utgard api)
So far, your Eclipse should look a bit like this:
After that we create a java file named UtgardTutorial1 with following content:
package org.openscada.opc.tutorial;
import java.util.concurrent.Executors;
import org.jinterop.dcom.common.JIException;
import org.openscada.opc.lib.common.ConnectionInformation;
import org.openscada.opc.lib.da.AccessBase;
import org.openscada.opc.lib.da.DataCallback;
import org.openscada.opc.lib.da.Item;
import org.openscada.opc.lib.da.ItemState;
import org.openscada.opc.lib.da.Server;
import org.openscada.opc.lib.da.SyncAccess;

 public class UtgardTutorial1 {

    public static void main(String[] args) throws Exception {
        // create connection information
        final ConnectionInformation ci = new ConnectionInformation();
        ci.setHost("your host");
        ci.setDomain("");
        ci.setUser("your user");
        ci.setPassword("your password");
        ci.setProgId("SWToolbox.TOPServer.V5");
        // ci.setClsid("680DFBF7-C92D-484D-84BE-06DC3DECCD68"); // if ProgId is not working, try it using the Clsid instead
        final String itemId = "_System._Time_Second";
        // create a new server
        final Server server = new Server(ci, Executors.newSingleThreadScheduledExecutor());

        try {
            // connect to server
            server.connect();
            // add sync access, poll every 500 ms
            final AccessBase access = new SyncAccess(server, 500);
            access.addItem(itemId, new DataCallback() {
                @Override
                public void changed(Item item, ItemState state) {
                    System.out.println(state);
                }
            });
            // start reading
            access.bind();
            // wait a little bit
            Thread.sleep(10 * 1000);
            // stop reading
            access.unbind();
        } catch (final JIException e) {
            System.out.println(String.format("%08X: %s", e.getErrorCode(), server.getErrorMessage(e.getErrorCode())));
        }
    }
}
This is essentially a slightly modified variant of OPCTest2 from https://github.com/ctron/org.openscada.utgard/tree/1.0/org.openscada.opc.lib.test/src/org/openscada/opc/lib
Thats pretty much it. The output should be something like this:
... snip ...

Mai 15, 2013 11:51:34 AM rpc.DefaultConnection processOutgoing
INFO:
 Sending REQUEST
Mai 15, 2013 11:51:34 AM rpc.DefaultConnection processIncoming
INFO:
 Recieved RESPONSE
Value: [[org.jinterop.dcom.core.JIUnsignedInteger@7731802b]], Timestamp: Mi Mai 15 11:51:33 MESZ 2013, Quality: 192, ErrorCode: 00000000
Mai 15, 2013 11:51:34 AM rpc.DefaultConnection processOutgoing
INFO:
 Sending REQUEST
Mai 15, 2013 11:51:34 AM rpc.DefaultConnection processIncoming
INFO:
 Recieved RESPONSE
Value: [[org.jinterop.dcom.core.JIUnsignedInteger@f4e7d3d]], Timestamp: Mi Mai 15 11:51:34 MESZ 2013, Quality: 192, ErrorCode: 00000000
Mai 15, 2013 11:51:35 AM rpc.DefaultConnection processOutgoing
INFO:
 Sending REQUEST
Mai 15, 2013 11:51:35 AM rpc.DefaultConnection processIncoming
INFO:
 Recieved RESPONSE
Value: [[org.jinterop.dcom.core.JIUnsignedInteger@549ad97c]], Timestamp: Mi Mai 15 11:51:34 MESZ 2013, Quality: 192, ErrorCode: 00000000

... snip ...
The examples also have some code which shows how to browse the OPC tree.
Writing values
For this we need to configure a tag in TOPServer which is actually writable. So within the TOP Server configuration, click on "New Channel", choose "Simulator" as type, keep name "Channel1", keep on clicking on "next" until finally clicking on "Finish".
Now, click on "New Device". Also keep Name "Device1" and click to the end of the wizard.
Now we can create tags. Click on new Tag and call it "Tag1", Address K0000, Type "DWord" and Client access "Read/Write".
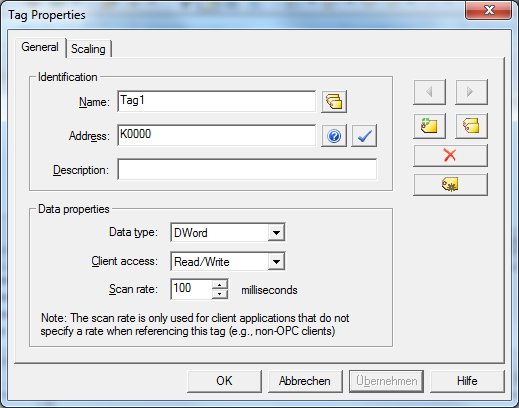
After that, the window should look like this:

Now we have to modify the code a bit, we improve the output, add a group to place the item into it, and add a thread to write a value every 3 seconds.
package org.openscada.opc.tutorial;
import java.util.concurrent.Executors;
import java.util.concurrent.ScheduledExecutorService;
import java.util.concurrent.TimeUnit;
import java.util.concurrent.atomic.AtomicInteger;
import org.jinterop.dcom.common.JIException;
import org.jinterop.dcom.core.JIVariant;
import org.openscada.opc.lib.common.ConnectionInformation;
import org.openscada.opc.lib.da.AccessBase;
import org.openscada.opc.lib.da.DataCallback;
import org.openscada.opc.lib.da.Group;
import org.openscada.opc.lib.da.Item;
import org.openscada.opc.lib.da.ItemState;
import org.openscada.opc.lib.da.Server;
import org.openscada.opc.lib.da.SyncAccess;

public class UtgardTutorial2 {

    public static void main(String[] args) throws Exception {

        // create connection information
        final ConnectionInformation ci = new ConnectionInformation();

        ci.setHost("your host");
        ci.setDomain("");
        ci.setUser("your user");
        ci.setPassword("your password");
        ci.setProgId("SWToolbox.TOPServer.V5");
        // ci.setClsid("680DFBF7-C92D-484D-84BE-06DC3DECCD68"); // if ProgId is not working, try it using the Clsid instead
        final String itemId = "Channel1.Device1.Tag1";
        // create a new server
        final Server server = new Server(ci, Executors.newSingleThreadScheduledExecutor());
        try {
            // connect to server
            server.connect();
            // add sync access, poll every 500 ms
            final AccessBase access = new SyncAccess(server, 500);
            access.addItem(itemId, new DataCallback() {
                @Override
                public void changed(Item item, ItemState state) {
                    // also dump value
                    try {
                        if (state.getValue().getType() == JIVariant.VT_UI4) {
                            System.out.println("<<< " + state + " / value = " + state.getValue().getObjectAsUnsigned().getValue());
                        } else {
                            System.out.println("<<< " + state + " / value = " + state.getValue().getObject());
                        }
                    } catch (JIException e) {
                        e.printStackTrace();
                    }
                }
            });

            // Add a new group
            final Group group = server.addGroup("test");
            // Add a new item to the group
            final Item item = group.addItem(itemId);

            // start reading
            access.bind();

            // add a thread for writing a value every 3 seconds
            ScheduledExecutorService writeThread = Executors.newSingleThreadScheduledExecutor();
            final AtomicInteger i = new AtomicInteger(0);
            writeThread.scheduleWithFixedDelay(new Runnable() {
                @Override
                public void run() {
                    final JIVariant value = new JIVariant(i.incrementAndGet());
                    try {
                        System.out.println(">>> " + "writing value " + i.get());
                        item.write(value);
                    } catch (JIException e) {
                        e.printStackTrace();
                    }
                }
            }, 5, 3, TimeUnit.SECONDS);

            // wait a little bit
            Thread.sleep(20 * 1000);
            writeThread.shutdownNow();
            // stop reading
            access.unbind();
        } catch (final JIException e) {
            System.out.println(String.format("%08X: %s", e.getErrorCode(), server.getErrorMessage(e.getErrorCode())));
        }
    }
}
The output should look like this:
Mai 15, 2013 4:31:30 PM rpc.DefaultConnection processOutgoing
INFO:
 Sending REQUEST
Mai 15, 2013 4:31:30 PM rpc.DefaultConnection processIncoming
INFO:
 Recieved RESPONSE
<<< Value: [[org.jinterop.dcom.core.JIUnsignedInteger@6f14021e]], Timestamp: Mi Mai 15 16:31:30 MESZ 2013, Quality: 192, ErrorCode: 00000000 / value = 0
Mai 15, 2013 4:31:30 PM rpc.DefaultConnection processOutgoing
INFO:
 Sending REQUEST
Mai 15, 2013 4:31:30 PM rpc.DefaultConnection processIncoming
INFO:
 Recieved RESPONSE
<<< Value: [[org.jinterop.dcom.core.JIUnsignedInteger@15de3027]], Timestamp: Mi Mai 15 16:31:30 MESZ 2013, Quality: 192, ErrorCode: 00000000 / value = 0
>>> writing value 1
Mai 15, 2013 4:31:31 PM rpc.DefaultConnection processOutgoing
INFO:
 Sending REQUEST
Mai 15, 2013 4:31:31 PM rpc.DefaultConnection processIncoming
INFO:
 Recieved RESPONSE
Mai 15, 2013 4:31:31 PM rpc.DefaultConnection processOutgoing
INFO:
 Sending REQUEST
Mai 15, 2013 4:31:31 PM rpc.DefaultConnection processIncoming
INFO:
 Recieved RESPONSE
<<< Value: [[org.jinterop.dcom.core.JIUnsignedInteger@69d5ee81]], Timestamp: Mi Mai 15 16:31:30 MESZ 2013, Quality: 192, ErrorCode: 00000000 / value = 0
Mai 15, 2013 4:31:31 PM rpc.DefaultConnection processOutgoing
INFO:
 Sending REQUEST
Mai 15, 2013 4:31:31 PM rpc.DefaultConnection processIncoming
INFO:
 Recieved RESPONSE
<<< Value: [[org.jinterop.dcom.core.JIUnsignedInteger@2a4c6a7d]], Timestamp: Mi Mai 15 16:31:31 MESZ 2013, Quality: 192, ErrorCode: 00000000 / value = 1
Mai 15, 2013 4:31:32 PM rpc.DefaultConnection processOutgoing
INFO:
 Sending REQUEST
Mai 15, 2013 4:31:32 PM rpc.DefaultConnection processIncoming
INFO:
 Recieved RESPONSE
<<< Value: [[org.jinterop.dcom.core.JIUnsignedInteger@17f99aa6]], Timestamp: Mi Mai 15 16:31:31 MESZ 2013, Quality: 192, ErrorCode: 00000000 / value = 1
Thats it, pretty much.
Unfortunately, this is in many cases not enough. In this example there is no error handling, and this is quite needed. Within the "OPC Driver" of the openSCADA project, all this stuff is handled for you. So please feel free to peruse the code to get a feel how it works: https://github.com/ctron/org.openscada.atlantis/tree/1.0/org.openscada.da.server.opc/src/org/openscada/da/server/opc
Other tutorials
If you have a tutorial and want to be linked here, please drop us a line.